Human Generated Data

Title

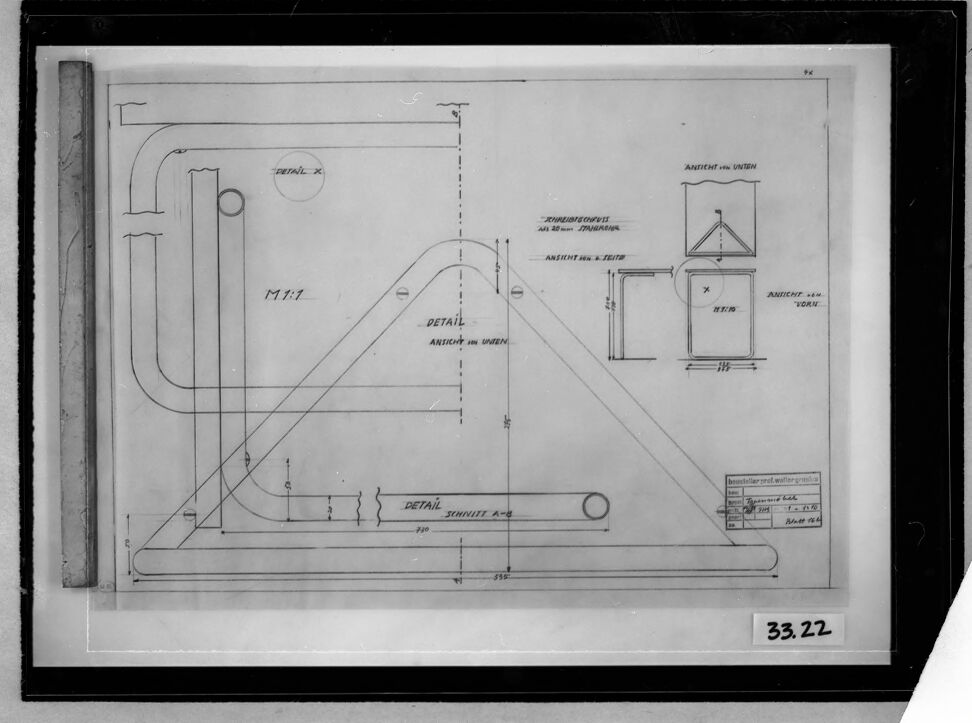
Furniture Designs, 1929-1932: Desk leg: details, 1:1, 1:10

Date

1929-1932

People

Artist: M.B., German active early 20th C.

Artist: Walter Gropius, German 1883 - 1969

Classification

Drawings

Credit Line

Harvard Art Museums/Busch-Reisinger Museum, Gift of Walter Gropius, BRGA.33A.22

Human Generated Data

Title

Furniture Designs, 1929-1932: Desk leg: details, 1:1, 1:10

People

Artist: M.B., German active early 20th C.

Artist: Walter Gropius, German 1883 - 1969

Date

1929-1932

Classification

Drawings

Credit Line

Harvard Art Museums/Busch-Reisinger Museum, Gift of Walter Gropius, BRGA.33A.22

Machine Generated Data

Tags

Amazon
created on 2020-04-26

Plot 99.2
Diagram 99.2
Plan 99.2
Screen 63.7
Display 63.7
Electronics 63.7

Clarifai
created on 2020-04-26

no person 99.7
chalk out 95.8
science 95.8
display 95.2
retro 93.2
physics 92.9
diagram 92.8
technology 91.5
room 91
one 90.5
people 89.7
antique 88.2
indoors 87.7
architecture 87.3
contemporary 87
wall 86.6
two 86.4
graphic design 86.4
graph 85.8
education 84.5

Imagga
created on 2020-04-26

oscilloscope 100
electronic equipment 100
equipment 76.8
old 36.9
grunge 36.6
frame 35
vintage 33.9
retro 31.1
texture 29.2
antique 27.6
border 25.3
dirty 22.6
design 21.9
board 21.4
paper 21.2
blackboard 21
art 20.7
blank 19.7
black 17.4
empty 17.2
wall 17.1
pattern 16.4
aged 16.3
ancient 15.6
film 15.5
grungy 15.2
chalkboard 14.7
scratch 14.6
rough 14.6
damaged 14.3
graphic 13.9
screen 13.7
chalk 13.6
school 13.5
material 13.4
decoration 13
digital 13
wood 12.5
edge 12.5
space 12.4
text 12.2
brown 11.8
weathered 11.4
drawing 11.3
education 11.3
photographic 10.8
collage 10.6
textured 10.5
monitor 10.4
nobody 10.1
frames 9.8
slide 9.8
business 9.7
classroom 9.7
strip 9.7
movie 9.7
computer 9.7
rust 9.6
rusty 9.5
sheet 9.4
finance 9.3
wallpaper 9.2
message 9.1
color 8.9
designed 8.8
noise 8.8
home 8.8
messy 8.7
your 8.7
photography 8.5
study 8.4
page 8.3
camera 8.3
element 8.3
historic 8.2
radio receiver 8.2
style 8.2
closeup 8.1
symbol 8.1
idea 8
interior 8
wooden 7.9
negative 7.8
card 7.6
learn 7.6
floor 7.4
backdrop 7.4
entertainment 7.4
paint 7.2
structure 7.1

Google
created on 2020-04-26

Microsoft
created on 2020-04-26

text 97.8
wall 95.3
drawing 94.9
indoor 90.7
sketch 88.7
map 87.9
black 80.7
white 79.6
plan 50.3

Color Analysis

Feature analysis

Amazon
Monitor

Clarifai

Picture frame

AWS Rekognition

Monitor 63.7%

Clarifai

Picture frame 96.7%

Categories

Imagga
created on 2020-04-26

text visuals 99.1%

Captions

Microsoft
created by unknown on 2020-04-26

a black and white photo 66.7%
a black and white photo of a computer 59%
a black and white photo of a desk 58.9%

Salesforce

Created by general-english-image-caption-blip-2 on 2025-06-28

a black and white photo of a drawing of a building

Created by general-english-image-caption-blip on 2025-05-21

a photograph of a drawing of a plan for a bathroom

OpenAI GPT

Created by gpt-4o-2024-05-13 on 2025-03-07

The image depicts a technical drawing or blueprint with detailed measurements and diagrams. The central focus is a triangular structure with several labeled views and details of its components. Various annotations and dimension lines provide specific measurements in millimeters.

Several smaller sections of the drawing show different perspectives, including side and sectional views marked as "Detail" and "Ansicht." The layout includes labels in German such as "Ansicht von unten" (view from below) and "Ansicht von vorne" (view from the front), along with scale annotations like "M 1:1" indicating the drawing scale.

A title block in the lower right corner contains more specific information about the drawing, including potential author or project identifiers, dates, or additional details.

Overall, the image appears to be a precise technical representation of a mechanical or architectural element, intended for use in manufacturing or construction.

Created by gpt-4 on 2025-03-07

The image you've provided appears to be a black and white photograph of an engineering drawing or blueprint. The drawing shows a side view and some details of a mechanical device, possibly a component of machinery. The diagrams include various geometric shapes, lines, and annotations indicating dimensions and design details.

To the right side, there are three smaller diagrams providing different views of a part of the machine: a top view, a frontal section view, and a bottom view. These smaller diagrams are labeled "ANSICHT VON OBEN" (top view), "ANSICHT VON UNTEN" (bottom view), and "ANSICHT VON VORN" (front view), indicating that the drawing likely originates from a German-speaking context or was made for German-speaking clients.

Below the smaller diagrams, there's a text box with additional information including, file numbers, and possibly a project title or the name of the design. Due to the resolution and angle of the photograph, specific textual details in the label are not fully legible.

The large numbers "33.22" are visible in the lower right corner of the image, which could refer to a cataloging or reference number associated with the design or drawing.

Anthropic Claude

Created by claude-3-opus-20240229 on 2025-01-13

The image shows a detailed technical drawing or blueprint of what appears to be a metal bracket or mounting hardware. The drawing includes various orthographic views showing the part from different angles, along with dimensions and annotations specifying sizes, angles, hole placements, and other manufacturing details.

The views depict a roughly triangular shaped metal part with flanges, bends, and attachment points. Dimensions are given in both decimal inches and fractional inches. The drawing number "33.22" is printed in the lower right corner.

This style of precise, dimensioned line drawing is typical of engineering drawings or fabrication blueprints used to manufacture parts to exact specifications. The schematic nature of the drawing allows it to unambiguously communicate the geometry and key dimensions of the component for production purposes.

Created by claude-3-haiku-20240307 on 2025-01-13

This image appears to be a technical drawing or blueprint. It shows various engineering diagrams and detailed measurements, possibly for some kind of mechanical or industrial design. The drawing includes detailed schematics and dimensions, as well as annotations and labels. The overall composition and style suggest this is a professional engineering document or technical specification.

Created by claude-3-5-sonnet-20241022 on 2025-01-13

This appears to be a technical engineering drawing or blueprint showing various pipe or conduit layouts and details. The drawing includes multiple views - a main plan view showing what appears to be a pipe system with bends and curves, and several smaller detail views in the upper right corner showing different angles and connections. The drawing has measurements and dimensions marked, and appears to be drawn to scale. It's labeled with "DETAIL" in a few places and includes some German text ("ANSICHT"). The drawing has a formal technical style typical of engineering documentation, rendered in black and white. In the bottom right corner, there appears to be a number "33.22". The overall presentation is framed in what looks like a photograph or copy of the original technical drawing.

Created by us.anthropic.claude-3-5-sonnet-20241022-v2:0 on 2025-06-24

This image appears to be a technical drawing or blueprint, likely for a model train layout or similar track system. The drawing shows various curved and straight track sections with detailed measurements and annotations. It includes multiple "DETAIL" callouts and what appear to be different viewing angles or perspectives labeled as "ANSICHT" (which is German for "view"). The drawing has a very architectural or engineering style to it, with precise lines and dimensions marked. The number "33.22" is visible in the bottom right corner, which could be a drawing number or reference. The document appears to be an older, possibly historical technical drawing, given its black and white appearance and traditional drafting style.

Meta Llama

Created by us.meta.llama3-2-90b-instruct-v1:0 on 2025-01-13

The image depicts a technical drawing of a mechanical component, likely a part of a larger machine or system. The drawing is rendered in black ink on a white background, with various lines, shapes, and annotations that provide detailed information about the component's design and dimensions.

Key Features:

  • Component Shape: The component appears to be a complex assembly of curved and straight sections, with multiple joints and connections.
  • Dimensions: The drawing includes various dimension labels, indicating the length, width, and height of different parts of the component.
  • Annotations: There are several annotations throughout the drawing, including notes on material specifications, tolerances, and assembly instructions.
  • Scale: A scale bar is visible at the bottom of the drawing, allowing viewers to accurately measure the component's dimensions.
  • Reference Points: Several reference points are marked on the drawing, including centers, edges, and corners, which help to define the component's geometry and orientation.

Overall Impression:

The technical drawing suggests that the component is a critical part of a larger system, requiring precise manufacturing and assembly to ensure proper function and performance. The level of detail and annotation in the drawing indicates a high degree of engineering expertise and attention to detail, likely reflecting a complex and sophisticated design process.

Created by us.meta.llama3-2-11b-instruct-v1:0 on 2025-01-13

The image presents a technical drawing, likely a blueprint or architectural plan, set against a gray background. The drawing is contained within a black frame and features a white paper with a black border.

Drawing Details:

  • The drawing is oriented horizontally, with the top edge facing upwards.
  • It is divided into two main sections: a larger section on the left and a smaller section on the right.
  • The left section contains various lines, shapes, and text, including:
    • A large rectangle with rounded corners, featuring a curved line that connects to a smaller rectangle.
    • A series of lines and shapes, possibly representing a structural element or component.
    • Text in an unknown language, likely German, which reads "DETAIL" and "DETAIL SCHWITZ A-6".
  • The right section features a smaller rectangle with a triangular shape above it, accompanied by additional text and lines.
  • A small box in the bottom-right corner contains a table with three columns and two rows, although the text is too small to decipher.

Frame and Background:

  • The drawing is placed within a black frame, which has a rough texture and appears to be made of wood or plastic.
  • The frame is set against a gray background, which may be a table or wall.

Overall:

  • The image suggests that the drawing is a technical or architectural plan, possibly for a building or structure.
  • The use of German text and the presence of specific details, such as the "DETAIL" label, indicate that the drawing is likely a technical or engineering document.
  • The image provides a clear and detailed view of the drawing, allowing the viewer to examine the various elements and features.

Amazon Nova

Created by amazon.nova-pro-v1:0 on 2025-01-13

The image appears to be a technical drawing or blueprint of a structure or system. The drawing is enclosed in a black frame and has a number "33.22" at the bottom right corner. The drawing consists of various lines, shapes, and annotations, which likely represent different components or elements of the structure or system. The drawing includes details such as "DETAIL," "M11.1," "ANSICHT," and "SCHNITT," which suggest that it is a detailed plan or schematic of a specific part or section of the structure or system.

Created by amazon.nova-lite-v1:0 on 2025-01-13

The image appears to be a technical drawing or blueprint of some sort. It contains various lines, shapes, and measurements, indicating it is a detailed diagram of some kind of structure or system. The drawing is labeled "33.22" in the bottom right corner, suggesting it is part of a larger set of plans or specifications. The text and numbers are written in German, indicating the origin of the document may be from a German-speaking country. The drawing shows a complex arrangement of pipes, tubes, and other components, with labels and dimensions provided. It appears to be a detailed engineering drawing, likely used for the design, construction, or maintenance of some kind of industrial or mechanical system.

Google Gemini

Created by gemini-2.0-flash-lite on 2025-05-17

Here's a description of the image:

The image is a black-and-white architectural or technical drawing, likely from a historical context. It appears to be a detailed plan or blueprint of some sort of structure, possibly machinery or a mechanical device.

Key Features:

  • Format: The drawing is rectangular and framed within a black border. It appears to be a photograph of an original drawing, as indicated by the 33.22 marking and the quality of the image.
  • Style: The drawing uses precise, clean lines and various annotations, including measurements, labels, and section views. The annotations are in German, as are the labels.
  • Content: The drawing depicts several elements, including:
    • Curved and straight lines, representing pipes, rods, or structural elements.
    • Geometric shapes, such as circles, triangles and rectangles.
    • Section views of specific details (e.g., a cross-section of a joint).
    • Dimensions and scale information (e.g., "M1:1" indicates a 1:1 scale).
    • Details indicating specific views (e.g., "ANSICHT von unten" which translates to "View from below").
  • Overall Impression: The image is very technical, detailed, and likely represents a blueprint or plan for a specific mechanism or structure. It would be the type of drawing used by engineers, architects, or draftsmen in a design or manufacturing process.

Created by gemini-2.0-flash on 2025-05-17

Here's a description of the image:

The image is a black and white photograph of what appears to be a framed technical drawing or blueprint. The drawing is primarily made up of straight lines and curved lines, creating an abstract design with elements of what may be piping or structural components.

Several handwritten labels in German are present on the drawing, indicating different views or sections of the design. Some labels include "DETAIL," "ANSICHT" (view), and "SCHNITT" (section). There are also dimensions and notes scattered throughout the drawing. The number "33.22" is prominently displayed in the lower right corner of the drawing.

The drawing is framed in a black frame. A measuring stick lies on the side of the frame. The photograph is of reasonable quality, with good contrast and clarity, allowing for easy viewing of the details in the drawing.

Mistral Pixtral

Created by us.mistral.pixtral-large-2502-v1:0 on 2025-06-03

The image shows a detailed technical drawing or blueprint, likely for a mechanical or structural component. Here is a detailed summary of the elements visible in the drawing:

  1. Main Structure:

    • The main structure appears to be a triangular frame with a curved top.
    • The frame is supported by vertical and horizontal beams.
    • There are several annotations indicating specific details and measurements.
  2. Details and Annotations:

    • Detail X: Located at the top left corner, likely referring to a specific part or section of the structure.
    • Detail Strut A-B: Located at the bottom, showing a detailed view of a strut or support beam.
    • Detail Ansicht im Schnitt: This refers to a cross-sectional view, providing internal details of the structure.
    • Ansicht von Unten: This indicates a view from below.
    • Ansicht von Vorne: This indicates a front view.
    • Ansicht von Hinten: This indicates a rear view.
    • Ansicht von Oben: This indicates a top view.
  3. Measurements and Dimensions:

    • Various dimensions are marked throughout the drawing, indicating the sizes and positions of different components.
    • Specific measurements like "912" and "940" are noted, likely in millimeters.
  4. Additional Notes:

    • There is a note in the bottom right corner with specifications, possibly related to materials or construction details.
    • The drawing is labeled with the number "33.22" in the bottom right corner.
  5. Presentation:

    • The drawing is framed and appears to be displayed, possibly for reference or exhibition purposes.

Overall, the image depicts a detailed engineering or architectural drawing with multiple views and dimensions, providing a comprehensive understanding of the structure's design and construction.

Qwen

Text analysis

Amazon

M1:1
UNTEN
DETAIL
ANTICHT
UEN
N
33.22
ANIC N UEN
ANTICHP
PETNL
VORN
ANSHNT
SENNITT
ANSHNT TEITE
PETNL x ANTICHT cea UNTEN
TEITE
ANIC
SENNITT A- 78
78
A
20-
-RNREISSeNrVIS
A 20- MMARON
ew A
A-
x
MMARON
*
cea
ME

Google

PETAL X ANTICHT UNTEN RHREISrSCress ANSIENT & TEIT M1:1 ANICHT VORN DETAIL ANSICHT N nEN bousteller ref. wallergrola DETAIL SCHNITT A-8 559 33. 22
PETAL
X
ANTICHT
UNTEN
RHREISrSCress
ANSIENT
&
TEIT
M1:1
ANICHT
VORN
DETAIL
ANSICHT
N
nEN
bousteller
ref.
wallergrola
SCHNITT
A-8
559
33.
22