Machine Generated Data
Tags
Color Analysis
Categories
Imagga
interior objects | 88% | |
text visuals | 11.4% | |
Captions
Microsoft
created by unknown on 2020-04-27
a black and silver text on a white surface | 69.7% | |
a white and black text | 69.6% | |
a black and white photo | 58.1% | |
Clarifai
created by general-english-image-caption-blip on 2025-05-17
a photograph of a drawing of a drawing of a window | -100% | |
OpenAI GPT
Created by gpt-4 on 2025-03-05
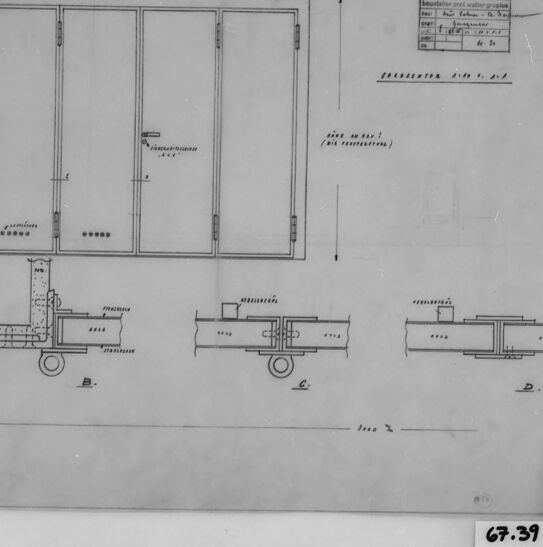
The image you've provided appears to be a black and white photograph or scan of an architectural drawing or blueprint. The drawing includes plan views of what seem to be sections of a building or a structure. There are various labeled parts and measurements indicating dimensions. It looks quite aged, possibly historical.
The blueprint is detailed with various lines, shapes, and annotations that represent walls, doors, and other structural elements. Across the top right corner, there appears to be a title or description block that could provide information about the drawing, such as the project name, scale, date, and who drafted or approved it, but the text is too small to read clearly.
At the bottom right, there's a white label marked "67.39," which may be a reference number related to the drawing or its filing system. The drawing is encased in a protective frame or mat border, which suggests it is treated as a document of significance or simply for archival purposes.
Created by gpt-4o-2024-05-13 on 2025-03-05
The image shows a technical drawing or architectural blueprint that appears to depict a cross-section of a structural component, possibly related to a door mechanism. The blueprint includes several detailed views and sections labeled A, B, C, and D, demonstrating various aspects and components of the design. Key features include measurements and annotations in Italian, such as "Scala di Scala," which suggests scales and dimensions. The drawing is detailed and methodical, typical of engineering or architectural plans. It is framed within a black border and appears to have a catalog number "67.39" labeled at the bottom right corner.
Anthropic Claude
Created by claude-3-5-sonnet-20241022 on 2025-01-14
This image appears to be a technical architectural or engineering drawing. It shows both a floor plan view (at the top) and several cross-sectional views (at the bottom) labeled as B, C, and D. The floor plan shows what appears to be a rectangular space divided into sections with doorways or openings. The cross-sectional drawings below detail what seems to be some kind of mechanical or structural element, possibly showing how different components fit together. The drawing is in black and white and appears to be a historical document or blueprint, with some text and numerical notations visible in the top right corner. There's also what appears to be an identification number "67.39" in the bottom right corner of the frame.
Created by claude-3-opus-20240229 on 2025-01-14
The image shows an architectural plan or blueprint for what appears to be a glass greenhouse or conservatory structure. The design consists of a large central rectangular space flanked by two smaller rectangular sections on either side. Dimensions and labels are provided, indicating the various components such as doors and ventilation openings. The plan is hand-drawn in pencil on paper or drafting film and has a timestamp of "67.39" in the lower right corner.
Created by claude-3-haiku-20240307 on 2025-01-14
The image appears to be an architectural drawing or blueprint showing the design and layout of a structure. The drawing includes multiple views and sections, including a front elevation and side views, as well as detailed technical specifications and dimensions. The overall design seems to feature a series of rectangular or square panels or openings, possibly windows or doors, arranged in a symmetrical pattern. The image does not contain any human faces or identifiable individuals.
Meta Llama
Created by us.meta.llama3-2-90b-instruct-v1:0 on 2025-01-14
The image presents a black-and-white technical drawing of a room, likely an architectural or engineering plan. The drawing is set against a white background and features a black border around the edges.
Key Features:
- Room Layout: The room is divided into three sections, with two doors on the left side and a smaller section on the right.
- Dimensions: The dimensions of the room are not explicitly stated, but the drawing provides a scale for measurement.
- Annotations: There are several annotations throughout the drawing, including labels and notes in an unknown language.
- Scale: A scale is provided in the bottom-right corner, allowing for accurate measurement of the room's dimensions.
- Border: The drawing is surrounded by a black border, which adds a touch of professionalism to the overall design.
Conclusion:
In summary, the image is a technical drawing of a room, showcasing its layout, dimensions, and annotations. The use of a scale and black border adds a level of precision and professionalism to the drawing, making it suitable for architectural or engineering purposes.
Created by us.meta.llama3-2-11b-instruct-v1:0 on 2025-01-14
The image depicts a technical drawing of a machine, likely a piece of industrial equipment. The drawing is presented in black and white, with various components and parts labeled with letters and numbers. The drawing is surrounded by a black border, which adds to its overall appearance of being a technical or engineering document.
The drawing appears to be hand-drawn, with precise lines and measurements indicating a high level of detail and accuracy. The use of letters and numbers to label different parts suggests that the drawing is intended for use in a technical or manufacturing context.
Overall, the image presents a detailed and technical representation of a machine, likely used for instructional or reference purposes.
Amazon Nova
Created by amazon.nova-pro-v1:0 on 2025-01-14
The image is a technical drawing or blueprint, likely representing a structural or mechanical design. The drawing is enclosed within a black border, suggesting it is a framed document or a section of a larger set of plans. The drawing appears to be a detailed, scaled representation of a mechanical or structural component, possibly part of a larger system or assembly.
At the top of the drawing, there is a rectangular block with multiple compartments or sections. Each compartment is divided by vertical lines, indicating different parts or components. The compartments are labeled with numbers and letters, such as "A," "B," and "C," which may correspond to specific parts or functions within the overall design.
Below the rectangular block, there are additional components or sections labeled "D" and "E." These sections are connected by lines and arrows, indicating the flow or interaction between different parts of the design. The lines and arrows suggest a sequence or process, possibly related to the operation or assembly of the mechanical or structural system.
In the bottom right corner of the drawing, there is a number "67.39," which could represent a scale, a part number, or a reference to another document or specification. The number is enclosed within a rectangular box, emphasizing its importance or relevance to the overall design.
The drawing is in black and white, typical of technical blueprints or schematics. The lines are precise and clean, indicating a professional or technical nature. The overall layout and organization of the drawing suggest a systematic and methodical approach to the design process.
In summary, the image is a technical drawing or blueprint that represents a detailed, scaled representation of a mechanical or structural component. The drawing includes various compartments, labeled sections, and connecting lines and arrows, indicating the interaction and sequence of different parts within the overall design. The number "67.39" in the bottom right corner likely serves as a reference or identifier for the specific design or component depicted in the drawing.
Created by amazon.nova-lite-v1:0 on 2025-01-14
The image shows a technical drawing or blueprint of some kind of machinery or equipment. The drawing is divided into sections, with various components and parts labeled. The top section shows a rectangular structure with multiple doors or openings. The middle section depicts a cylindrical component with a circular opening. The bottom section shows a series of rectangular blocks or components. The drawing appears to be a detailed technical diagram, likely used for manufacturing or engineering purposes.
Created by amazon.nova-lite-v1:0 on 2025-01-11
The image is a technical drawing or blueprint of a mechanical or industrial component. It appears to be a cross-sectional view of a part with various dimensions and annotations. The drawing is divided into two main sections:
The upper section shows a rectangular shape with multiple openings or slots. There are labeled dimensions and annotations indicating measurements and specifications for the component.
The lower section depicts a more complex assembly with multiple parts and components. There are labeled dimensions, annotations, and reference numbers indicating various parts and their relationships.
The drawing is enclosed within a black border, and there is a label "67.39" in the bottom right corner, likely indicating a revision number or identification for the drawing.
Overall, the image appears to be a technical drawing for a mechanical or industrial component, providing detailed specifications and dimensions for manufacturing or assembly purposes.
Created by amazon.nova-pro-v1:0 on 2025-01-11
The image is a technical drawing or blueprint that appears to be a detailed plan for a specific structure or machine. It is a black-and-white drawing with a grid-like background, which is typical for architectural or engineering blueprints. The drawing includes several sections and components, each labeled with letters and numbers for reference. The top section shows a series of rectangular shapes, possibly representing panels or sections of a larger structure. Below this, there are additional diagrams that could be parts of a machine or system, with arrows and lines indicating connections or flow. The bottom part of the image includes a scale and a reference number "67.39," which might indicate the scale of the drawing or a specific part number. The overall layout suggests a complex design, likely for an industrial or mechanical application.
Google Gemini
Created by gemini-2.0-flash-lite on 2025-05-17
The image presents an architectural blueprint, likely a technical drawing for a building project. It is a framed grayscale image with a white background. The drawing appears to detail a facade element with large glass panels, possibly a door or a wall section. It includes various sectional views and labels, hinting at the structural components and their assembly.
Key elements visible:
- Facade detail: The main section depicts a series of large, vertically-oriented panels. These are likely glass due to the thin lines and the style of the drawing. It seems that there is a door with a handle in the middle.
- Sectional views: Below the facade, there are additional drawings (labeled B, C, and D) that seem to be sectional views, showcasing how the facade meets the ground or floor.
- Text and labels: Throughout the drawing, there is text written in a technical manner. Labels, dimensions, and notations describe materials and construction specifications.
- Measurements: Dimensions are noted, indicating the scale and size of the different elements.
- Frame: The drawing is framed within a black frame, which is common for preserving documents.
Overall, it is a detailed technical drawing, providing specifications and construction details for a part of a building facade.
Created by gemini-2.0-flash on 2025-05-17
Here is a description of the image:
The image shows a black and white photograph of a framed technical drawing or blueprint. The drawing is composed of various architectural or engineering schematics and text in a technical style.
The drawing features multiple components:
At the top is a window or door system consisting of multiple panes separated by vertical lines.
Below the window is a diagram with the label "B" that features pipe-like structure.
Adjacent to the "B" diagram are 2 smaller details, each with the label "C" and "D", respectively.
The drawing also includes handwritten notes and measurements written in a small and neat style.
At the bottom right corner of the photograph, printed on the outer white edge of the drawing, is the number "67.39" written in a simple font.