Machine Generated Data
Tags
Color Analysis
Feature analysis
Amazon
Categories
Imagga
text visuals | 99.9% | |
Captions
Microsoft
created by unknown on 2023-01-27
diagram | 99.7% | |
Clarifai
created by general-english-image-caption-blip on 2025-05-29
a photograph of a drawing of a drawing of a room with a drawing of a room with a | -100% | |
OpenAI GPT
Created by gpt-4o-2024-11-20 on 2025-06-14
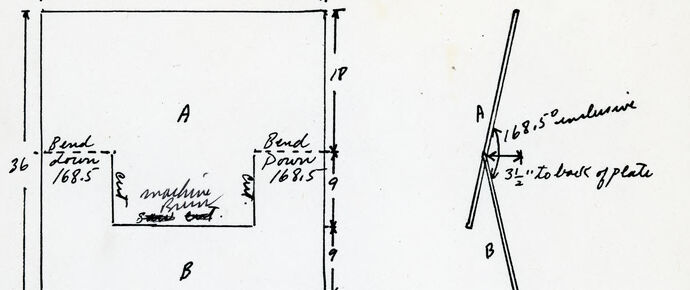
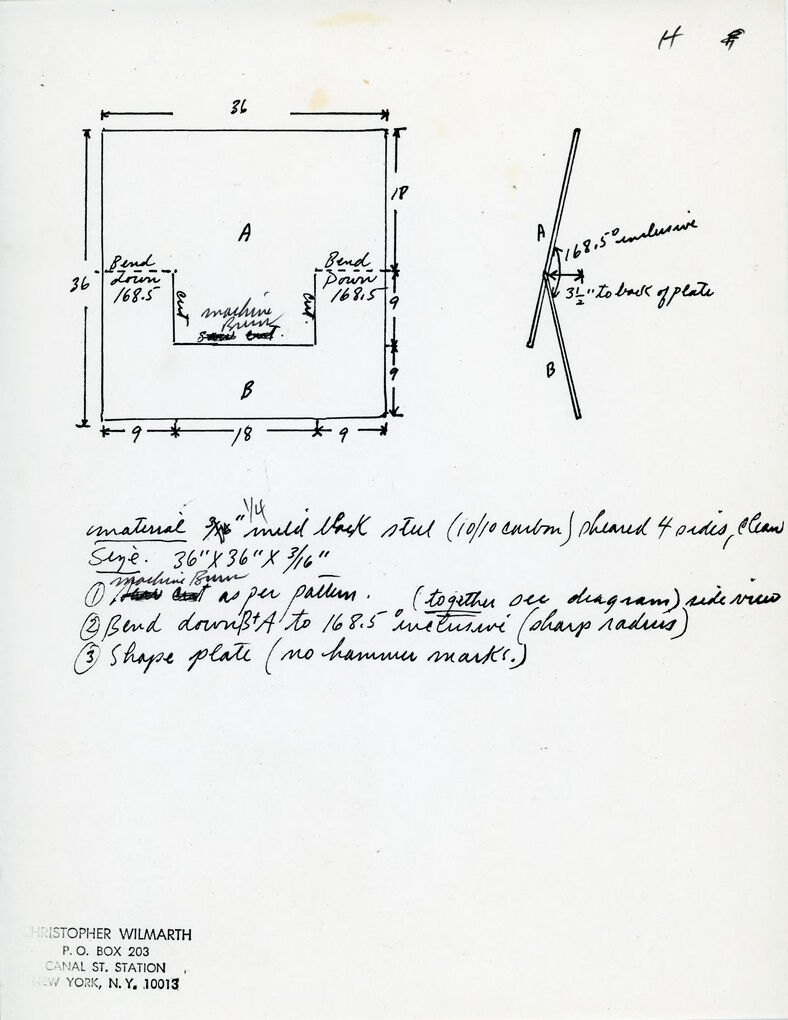
This image is a hand-drawn technical sketch with specific measurements and instructions, likely related to the design and fabrication of a steel structure or component. The drawing consists of two diagrams labeled "A" and "B." The left diagram shows a square with dimensions marked, and internal lines representing bending angles and section placement. The square is 36 inches by 36 inches, with details indicating offsets (e.g., 9 inches, 18 inches) and bends labeled as "168.5" degrees.
The right diagram shows a side view or profile representation of the bent component, emphasizing the angle (168.5 degrees inclusive) and its relationship to the base plate, labeled further with a precise measurement of "3½ inches to base of plate."
Below the diagrams, handwritten instructions detail the material specifications and steps for fabrication:
- Use "mild black steel (10/10 carbon), sheared 4 sides clean."
- Prepare the size as "36'' x 36'' x 3/16''."
- Follow steps such as "bend as per pattern" and "bend down A to 168.5° inclusive (sharp radius)." It also mentions ensuring smooth shaping with "no hammer marks."
The page includes an address at the bottom: "Christopher Wilmarth, P.O. Box 203, Canal St. Station, New York, N.Y. 10013," indicating the artist or designer responsible for this technical drawing.
This image appears to combine functional design with artistic intention.
Created by gpt-4o-2024-08-06 on 2025-06-14
The image appears to be a sketch or technical drawing accompanied by handwritten notes.
The main sketch on the left side of the image shows a square with dimensions labeled as 36" x 36". Inside this square, there is a section labeled with letters "A" and "B", and additional measurements such as 18" and 9" are marked on the sides. Annotations include instructions to "Bend Turn 168.5°" and "Bend Draw 168.5°". The words "machine burrs," "stress bend," and other notes are written inside the section.
On the right side, another drawing depicts two intersecting lines or planes labeled "A" and "B" with an angle labeled as "168.5° inclusive" and a note measuring "3 1/2" to base of plate."
Below the drawings, handwritten notes specify the material as "1/4" mild steel" and indicate a process for shaping the material. There are three enumerated instructions: shape the material "as per pattern," bend down from "A to B to 168.5° inclusive (sharp radius)," and ensure there are "no hammer marks" when shaping the plate.
At the bottom of the page, there is text indicating the name and address, "CHRISTOPHER WILMARTH P.O. BOX 203 CANAL ST. STATION NEW YORK, N. Y. 10013." The handwritten notes and schematics suggest this is a design or fabrication instruction document, possibly for a sculpture or industrial component.
Anthropic Claude
Created by us.anthropic.claude-3-5-sonnet-20241022-v2:0 on 2025-06-22
This image appears to be a technical drawing or blueprint showing specifications for a metal plate or panel. The drawing includes:
- A top-down view showing a rectangular shape with dimensions of 36" x 36"
- The design is divided into sections labeled A and B
- Various measurements are marked, including:
- 9" sections on the sides
- 18" in the middle
- A bend point marked at 168.5°
- Reference to "31½" to back of plate"
Below the drawing are written instructions numbered 1-3 that specify:
- Something "as per pattern"
- Bend down at 168.5° inclusive (sharp radius)
- Shape plate (no hammer marks)
At the bottom of the page appears to be contact information for someone at a Canal St. Station address in New York.
The drawing appears to be a fabrication specification for a custom metal piece that requires precise bending and shaping.
Created by anthropic.claude-3-haiku-20240307-v1:0 on 2025-06-22
The image appears to be a technical diagram or schematic. It contains various measurements, dimensions, and annotations describing the construction of an object or structure. The diagram includes a rectangular shape labeled "A" and "B", as well as additional notes and calculations. There are also some handwritten comments and instructions at the bottom of the image. Overall, this seems to be an engineering or architectural drawing, though I cannot determine the specific purpose or nature of the object being depicted.
Meta Llama
Created by us.meta.llama3-2-11b-instruct-v1:0 on 2025-06-05
The image presents a hand-drawn diagram and handwritten notes on a white piece of paper, likely a technical or instructional document. The diagram is divided into two sections: a larger square on the left and a smaller rectangle on the right.
Diagram:
- The larger square is labeled "36" on the top and bottom edges and "9" on the left and right edges.
- It contains a smaller rectangle labeled "A" with dimensions "Bend Down 168.5" and "Bend Up 168.5".
- The rectangle has a smaller square inside it, labeled "B", with dimensions "9" on the top and bottom edges and "18" on the left and right edges.
- The smaller rectangle also has a line labeled "Machine Turning" and a note that reads "Bend Down 168.5 to 168.5 inclusive (sharp radius)".
Handwritten Notes:
- Below the diagram, there are several lines of handwritten notes in cursive script.
- The first line reads "material: 1/4 mild steel stl (10/10 carbon) shaped 4 sides, clean edge. 36" X 36" X 3/16".
- The second line reads "1 machine turn as per pattern. (together one diagram) side view".
- The third line reads "2 Bend down 168.5 to 168.5 inclusive (sharp radius)".
- The fourth line reads "3 Shape plate (no hammer marks.)".
Footer:
- At the bottom of the page, there is a footer with the following information:
- CHRISTOPHER WILMARTH
- P.O. BOX 203
- CANA ST. STATION
- NEW YORK, N.Y. 10013
Overall, the image appears to be a technical drawing or instructional document related to metalworking or manufacturing, possibly for a specific project or product.
Created by us.meta.llama3-2-90b-instruct-v1:0 on 2025-06-05
The image depicts a hand-drawn diagram of a metal plate, accompanied by handwritten notes and measurements. The diagram is divided into two sections: the left side features a square shape with dimensions labeled in inches, while the right side shows a cross-section of the plate with additional measurements.
Key Features:
- Square Shape: The left side of the diagram displays a square shape with dimensions labeled in inches. The top and bottom edges are marked with "36" inches, while the left and right edges are marked with "18" inches.
- Cross-Section: The right side of the diagram shows a cross-section of the plate, with measurements labeled in inches. The top edge is marked with "168.5" inches, while the bottom edge is marked with "31" inches.
- Handwritten Notes: The diagram includes handwritten notes that provide additional information about the metal plate. The notes mention the material used (mild steel), the thickness (1/4 inch), and the shape of the plate (no hammer marks).
- Measurements: The diagram includes various measurements, including the length and width of the plate, as well as the thickness of the material.
- Signature: The diagram is signed by Christopher Wilmarth, who is likely the creator of the diagram.
Overall: The diagram provides a detailed representation of a metal plate, including its dimensions, material, and shape. The handwritten notes and measurements add additional context to the diagram, making it a useful tool for understanding the design and construction of the plate.
Amazon Nova
Created by amazon.nova-lite-v1:0 on 2025-06-03
This image is a technical drawing, likely for a metalworking or fabrication project. The drawing shows a rectangular piece of material, with dimensions and measurements indicated. The material is specified as "1/4" mild steel," and it is to be sheared to size. The drawing includes instructions for bending the material, with specific angles and measurements provided. The drawing also includes a diagram of the finished product, showing how the material should be shaped and assembled. The drawing is labeled with the name of the person who created it, Christopher Wilmarth, and includes a mailing address for correspondence.
Created by amazon.nova-pro-v1:0 on 2025-06-03
The image depicts a technical drawing on a white sheet of paper. The drawing consists of two main parts: a rectangular diagram and a set of written instructions. The rectangular diagram includes dimensions, labels, and annotations, while the written instructions provide detailed steps for a specific process. The drawing appears to be a technical blueprint or instruction manual for a mechanical or engineering project.
Google Gemini
Created by gemini-2.0-flash on 2025-05-31
Here's a description of the image based on the OCR and visual elements:
Overall:
The image is a scan of a handwritten technical drawing or design sketch on white paper. It appears to be a design for a metal fabrication project. At the bottom left is the address of CHRISTOPHER WILMARTH P. O. BOX 203 CANAL ST. STATION NEW YORK, N. Y. 10013
Elements:
Square Diagram: A large square is centrally located in the top-left portion of the image. It's divided into sections labeled "A" and "B". Dimensions (36, 18, 9) are noted around the square, indicating the lengths of the sides and subsections. There are indications of "Bend Down 168.5" on either side of the section B. "machine bunk support surf." is written inside.
Angle Diagram: To the right of the square, there's a diagram showing two lines intersecting at an angle. The angle is labeled as "168.5° inclusive." A line indicates "3 1/2" to back of plate". the lines are labeled A and B.
Handwritten Notes: Text provides details on materials, dimensions, and construction instructions.
- Material: 1/4" mild black steel (10/10 carbon) sheared 4 sides, clean.
- Size: 36" x 36" x 3/16"
- The notes then provide instructions: 1. Machine cut as per pattern (together see diagram) side view. 2. Bend down 'A' to 168.5 inclusive (sharp radius). 3. Shape plate (no hammer marks).
Interpretation:
The image shows a technical drawing with annotations, likely intended for a metal fabricator. It provides specifications for material, dimensions, and bending instructions for a particular design. The "machine bunk support surf." label inside the square diagram suggests that the fabricated piece may be part of a support structure for a bunk.
Created by gemini-2.0-flash-lite on 2025-05-31
Here's a description of the image:
Overall:
The image appears to be a technical drawing or sketch, likely a blueprint or a design guide for a fabricated metal object. It contains both a plan view and a side view, along with handwritten notes detailing material specifications and fabrication instructions.
Specifics:
Plan View (Top Left):
- A square shape with dimensions labeled as 36 x 36, and 18 across
- Rectangular cutout in the center with the dimensions marked
- Labels indicating "Bend Down" with an angle of 168.5 degrees.
- Callouts indicating cuts.
Side View (Top Right):
- A side profile illustrating the 168.5-degree bend
- Labels including "A" and "B" to indicate the position.
- Shows an angle of 168.5 degrees with a measurement of 3/2" to the back of the plate.
Handwritten Text:
- Material: 1/4" mild black steel (10/10 carbon) sheared 4 sides, clean
- Size: 36" x 36" x 3/16"
- "Joints as per pattern. (together see diagram) side view"
- "Bend down 'A' to 168.5 inclusive (sharp radius)"
- "Shape plate (no hammer marks.)"
Address:
- Christopher Wilmarth
- P.O. Box 203
- Canal St. Station
- New York, N.Y. 10013
Interpretation:
The image describes the fabrication of a metal component. The plan view seems to show the overall shape and cutouts of the piece. The side view details the bending operation that will be required. The text specifies the material, dimensions, and key fabrication steps, including bending angles and radius. It appears to be a technical drawing for a metalworking project.
Mistral Pixtral
Created by us.mistral.pixtral-large-2502-v1:0 on 2025-06-03
The image is a technical drawing with accompanying notes, detailing the specifications for fabricating a metal plate. Here's a detailed summary:
Drawing Details:
Dimensions of the Plate:
- The overall size of the plate is 36 inches by 36 inches with a thickness of 3/8 inches.
- The plate has a central rectangular cutout area labeled "A" with dimensions 18 inches by 18 inches.
- There are two smaller rectangular cutouts on either side of the central cutout, labeled "B," each measuring 9 inches by 9 inches.
- The smaller cutouts have rounded corners with a radius of 1/4 inch.
Bends:
- There are two bends indicated, each 168.5 degrees, which are sharp radius bends.
- The bends are located 31 inches from the back of the plate.
Notes:
Material Specifications:
- The material is 3/8 inch mild black steel (10/10 carbon) sheared for a clean edge.
Fabrication Instructions:
- Step 1: Shear each as per pattern (refer to the diagram for side view).
- Step 2: Bend down 90 degrees to a 168.5-degree interior (sharp radius).
- Step 3: Shape plate (no hammer marks).
Contact Information:
- Name: Christopher Wilmarth
- Address: P.O. Box 203, Canal St. Station, New York, NY 10013
This drawing and notes provide clear instructions for the fabrication of a specific metal plate, including dimensions, bends, and material specifications.